Configuring an SPN in Active Directory for Kerberos.NET
In my last post I talked about trying out the Kerberos.NET sample project and mentioned that hitting the endpoint from a browser isn’t going to work because Active Directory doesn’t know about the application. Let’s see what we can do to fix this.
A Service Principal Name (SPN) is a unique identifier tied to an account in Active Directory. They exist in the form {service}/{identifier}, e.g. HTTP/foo.bar.com. They are used to uniquely identify a service that can receive Kerberos tickets. When a browser is prompted to Negotiate authentication it uses the requesting domain (minus scheme and port) to find an SPN with the service of “HTTP”. Therefore our domain of localhost would have an SPN of “HTTP/localhost”. Of course, localhost isn’t allowed, so we’ll need a real domain. We’ll get to that.
First, you need an Active Directory domain. Hyper-V is your friend. Go create a VM; I’ll wait. Okay, you’ve got your VM, now go add Active Directory (Add Role, promote, reboot).
Okay, now the fun part. Build the sample application and copy it over to your VM. Launch the application. You should see it waiting for requests. Try hitting the URL https://localhost:9000/ from within the VM. You’ll notice you still have the NTLM problem. This is because an SPN couldn’t be found for the service. We could add an SPN for localhost, but as I mentioned previously, localhost is a special case and can’t be used. In my case I just used a fake domain within my forest test.identityintervention.com. To make it accessible I just added a hosts file entry pointing to 127.0.0.1.
You may notice that starting a web listener on localhost won’t receive traffic from a custom domain — doh. You need to make a minor modification to the code and switch the “localhost” to “*” so the listener will listen on any domain.
string baseAddress = "https://localhost:9000/"; => "https://*:9000/"
The reason it’s not defaulted to * is because it requires administrative privileges to run, which is just annoying.
Rebuild the application and copy it over to the VM. Launch the application. You may have to run the application as Administrator if you get a permissions error.
At this point hitting the new endpoint will prompt for credentials and get us that same NTLM error, but that’s expected because we still haven’t created the SPN. Let’s go do that.
- Launch the Active Directory Users and Computers management console.
- Select View > Advanced Features (how many of you didn’t know that existed? It made my day the first time I learned about it).
- Navigate to the Users container and right click > New > User.
- Give it a name. I used “Service Host”.
- Hit next, and set the password to “P@ssw0rd!” without quotes.
- Save the user.
- Find our newly created user and right click > Properties > Attribute Editor (again, who didn’t know about that? Awesome, right?).
- Scroll down and find “servicePrincipalNames”. It’ll have an empty value. Click Edit.
- Add the SPN we defined earlier of “HTTP/test.identityintervention.com”
- Save all the changes
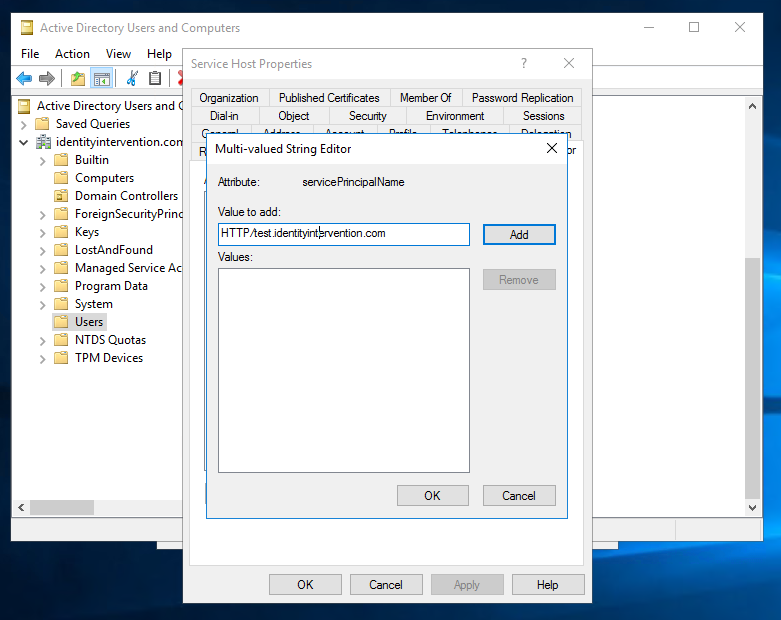
Adding a Service Principal Name
Alright, we now have an SPN for our service. You’ll notice the password you entered matches the password used in the sample code. This isn’t a coincidence — Active Directory uses this as the key to encrypt the ticket. Only the service should know the password, so only it can decrypt it. Now try hitting the our endpoint in the browser again. This time you’ll be prompted for credentials again, but the service will now be able to decrypt the ticket and you’ll end up with a result along the lines of:
Request: Mechanism: SPNEGO | MessageType: KRB_AP_REQ | SName: NT_SRV_INST, HTTP,test.identityintervention.com |
Realm: IDENTITYINTERVENTION.COM | Ticket EType: RC4_HMAC_NT | Auth EType: RC4_HMAC_NT

Ticket: Flags: 1084293120 | CName: NT_PRINCIPAL, Administrator | CRealm: IDENTITYINTERVENTION.COM; | Version: 5 |
Realm: IDENTITYINTERVENTION.COM | Sequence: 1966700342
That all looks about right, but being prompted for credentials is kind of annoying. Windows isn’t detecting that your test domain is within the intranet zone so it’s not going to automatically send a ticket (it won’t even check that the SPN exists). To fix this just add your test domain to the intranet zone on your computer.
- Open Internet Explorer
- Open the Settings > Security tab
- Select Local Intranet Zone and hit the Sites button
- Add the site https://test.identityintervention.com to the list and save it
- Close the browser and retry the request
Look Ma, no prompt!